:strip_icc()/Kitchen-lantern-pendant-lights-A9L6xax3qhLAyndAII4Uw5-28fb78d0c41d45eba23238d8650ea919.jpg)
Sun Apr 06 - Written by: Denis Maina
15 Stunning Ways to Style Your Island Countertop Like a Pro
Your kitchen island isn't just a workspace – it's the heart of your home where family gathers and memories are made. But if you're looking at your plain countertop thinking 'there's got to be more I can do with this,' you're right! Whether you've got a small breakfast bar or a massive centerpiece island there are countless ways to make it pop.
Ready to transform your kitchen island from basic to beautiful? We’ve rounded up 15 pro styling tricks that’ll turn your countertop into a showstopper. From simple decor swaps to clever organization hacks these ideas work for any style or budget. You’ll learn how to layer different elements create eye-catching focal points and keep things both functional and fabulous.
Creating a Stunning Focal Point with Statement Lighting
Transform your island countertop into a showstopping centerpiece with expertly placed lighting fixtures that combine style and functionality.
Elegant lantern pendant lights create a striking focal point above a white marble kitchen island. Source: Better Homes & Gardens
Pendant Light Arrangements
Add instant drama to your kitchen island with strategically placed pendant lights. Hang them 30-36 inches above your countertop surface for optimal illumination. For a balanced look install 2-3 pendants spaced evenly across a standard 6-foot island or 3-4 pendants for larger surfaces. Choose matching pendants in metallic finishes like brushed nickel brass or matte black to coordinate with your kitchen hardware. Play with different heights to create visual interest try hanging alternate pendants slightly lower for a dynamic display. For maximum impact select pendants that are 12-15 inches in diameter which will provide ample task lighting without overwhelming the space.
Artistic Chandeliers
Make a bold statement with a single eye-catching chandelier centered above your island. Modern sputnik-style fixtures or geometric designs can instantly elevate your kitchen’s style. Choose a piece that’s roughly 1/3 the width of your island a 24-inch chandelier works perfectly above a 6-foot countertop. Opt for adjustable options with dimming capabilities to control the ambiance. Popular styles include industrial cage designs glass globe clusters and minimalist LED rings. Install the bottom of your chandelier 30-36 inches above the counter surface to maintain proper clearance while creating an intimate atmosphere. Remember to consider your ceiling height allow at least 7 feet of clearance between the floor and the lowest point of the fixture.
:strip_icc()/Modern-kitchen-chandelier-4TVGHvS-a8h8WCHSsZBqR2-94728c1b59d146b8b8d01266f5ef4665.jpg) Contemporary chandelier installation creates visual drama above a sleek kitchen island. Source: Better Homes & Gardens
Contemporary chandelier installation creates visual drama above a sleek kitchen island. Source: Better Homes & Gardens
Incorporating Natural Elements and Textures
Bring the outdoors inside by adding organic elements to your island countertop for a fresh and inviting atmosphere.
Fresh Herb Gardens
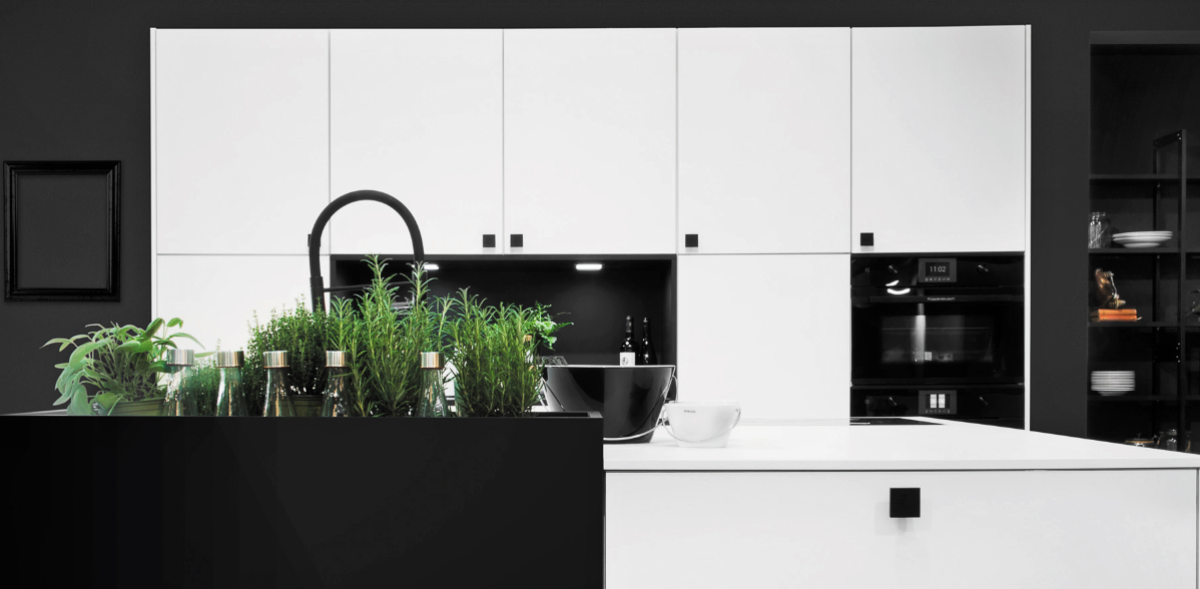
Transform your island countertop into a functional green space with a stylish herb garden. Place 3-4 matching ceramic pots filled with commonly used herbs like basil thyme and rosemary in a neat row or cluster. Choose low-profile containers that won’t block sightlines and opt for herbs that thrive indoors with moderate sunlight. Add small plant markers or decorative stakes to identify each herb while adding visual interest. For a polished look use coordinating pots in varying heights but keep them proportional to your counter space.
 Built-in herb garden on kitchen island provides both functionality and natural beauty. Source: These Three Rooms
Stone and Wood Accents
Add warmth and texture to your island countertop with natural stone and wood elements. Place a chunky wooden cutting board or serving platter as an anchor piece then layer with stone coasters marble trivets or a slate cheese board. Mix materials like a teak bowl filled with smooth river rocks or a concrete planter holding wooden utensils. Keep the palette neutral with warm woods and cool stones for balance. For daily functionality group items on a natural fiber placemat or wooden tray that’s easy to move when you need the counter space.
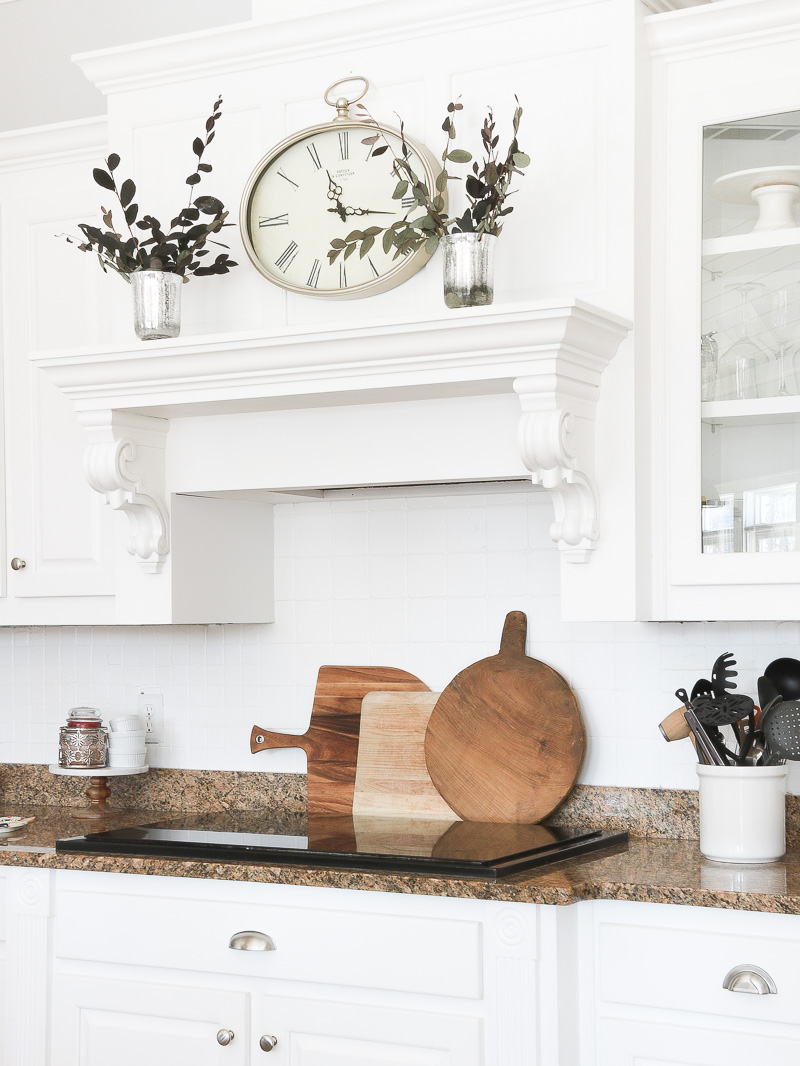 Various wooden cutting boards add warmth and texture to a white kitchen island. Source: Duke Manor Farm
Styling with Functional Kitchen Equipment
Transform your island countertop into a chef’s workspace by incorporating practical yet visually appealing kitchen equipment.
Professional-Grade Appliances
Add instant culinary credibility to your island with sleek professional-grade appliances. Install a built-in induction cooktop with smooth black glass that doubles as extra counter space when not in use. Consider adding a compact wine fridge or beverage center that fits perfectly under the counter while maintaining clean lines. A countertop-mounted pot filler in brushed nickel or matte black creates a luxe focal point while offering practical functionality. For serious home chefs a vacuum sealer or sous vide machine can be stylishly displayed to show off your culinary interests.
Stylish Cooking Tools
Display your most attractive cooking tools in intentional groupings for both function and style. Arrange copper cookware on a minimalist wall-mounted rack above the island or showcase colorful enameled Dutch ovens as statement pieces. Use sleek glass or ceramic canisters to store frequently used utensils like wooden spoons spatulas and whisks. Place a marble or wooden utensil holder at one end of the island filled with matching stainless steel tools. Create a designated prep station with an architectural knife block premium cutting boards and coordinated mixing bowls that complement your kitchen’s color scheme.
Adding Color Through Decorative Elements
Transform your island countertop into a vibrant focal point with strategic pops of color that complement your kitchen’s palette.
Colorful Cookware Display
Showcase your favorite enameled cookware pieces to add instant color to your island countertop. Arrange 2-3 Le Creuset or Staub Dutch ovens in complementary hues like cobalt blue flame orange or sage green on a wooden trivet. Position your most-used pieces at one end of the island creating a functional yet eye-catching display. Add height variation by incorporating matching mini cocottes or butter warmers alongside the larger pieces. For a cohesive look pair your colorful cookware with coordinating utensil holders or spoon rests in similar tones.
:max_bytes(150000):strip_icc()/2-credit-annie-schlechter-styling-matthew-gleason-bc6ab5e8f8b24ced8159cd11f8dc0b95.jpeg) Colorful cookware and accessories create a cheerful display on a neutral kitchen island. Source: Southern Living
Colorful cookware and accessories create a cheerful display on a neutral kitchen island. Source: Southern Living
Vibrant Fresh Produce Arrangements
Turn everyday fruits and vegetables into stunning decor by creating purposeful produce displays. Place a shallow ceramic bowl filled with bright citrus fruits like lemons oranges and limes for a pop of yellow and orange. Arrange fresh herbs in mason jars to add vertical green elements while keeping them accessible for cooking. Create visual interest with varying heights by stacking artisanal bread boards topped with seasonal produce like purple artichokes or red pomegranates. Keep your display fresh and practical by rotating items based on what you’ll actually use in your cooking that week.
Organizing with Designer Storage Solutions
Transform your island countertop into a clutter-free masterpiece with high-end storage solutions that blend style with functionality.
Stylish Container Sets
Elevate your island’s organization with matching container sets in premium materials like glass bamboo or matte ceramic. Choose airtight canisters with wooden lids for storing frequently used items like coffee beans sugar or flour. Display 3-4 containers in graduating sizes for visual interest keeping the tallest container under 12 inches to maintain clear sightlines. Opt for neutral-colored sets that complement your kitchen’s palette or go bold with metallic accents like copper or brass lid details. Add custom labels in a coordinating font to create a cohesive upscale look.
Decorative Baskets and Trays
Incorporate woven baskets and sleek trays to create designated zones on your island countertop. Use low-profile rattan baskets to corral everyday items like fruit napkins or cooking oils keeping heights under 6 inches to maintain a clean look. Position a metallic tray at one end of the island for a styled coffee or tea station. Mix materials like brass bamboo and marble for added dimension. Keep the rule of thirds in mind when arranging multiple pieces leaving enough workspace for meal prep. Select pieces with clean lines and interesting textures that complement your kitchen’s overall design scheme.
Layering Different Heights and Dimensions
Create visual interest on your island countertop by playing with varying heights and dimensions to draw the eye and make your space more dynamic.
Tiered Display Stands
Transform your countertop’s functionality with elegant tiered display stands. Place a sleek 3-tier stand in copper or matte black to showcase your favorite kitchen items like fresh pastries seasonal fruits or small potted herbs. Position larger items on the bottom tier (like bread boxes or fruit bowls) and gradually decrease item sizes as you move up. For maximum impact arrange multiple stands of different heights in groups of 2-3 creating an asymmetrical display that adds depth to your space. Mix materials like glass marble and wood to add textural interest while maintaining a cohesive look.
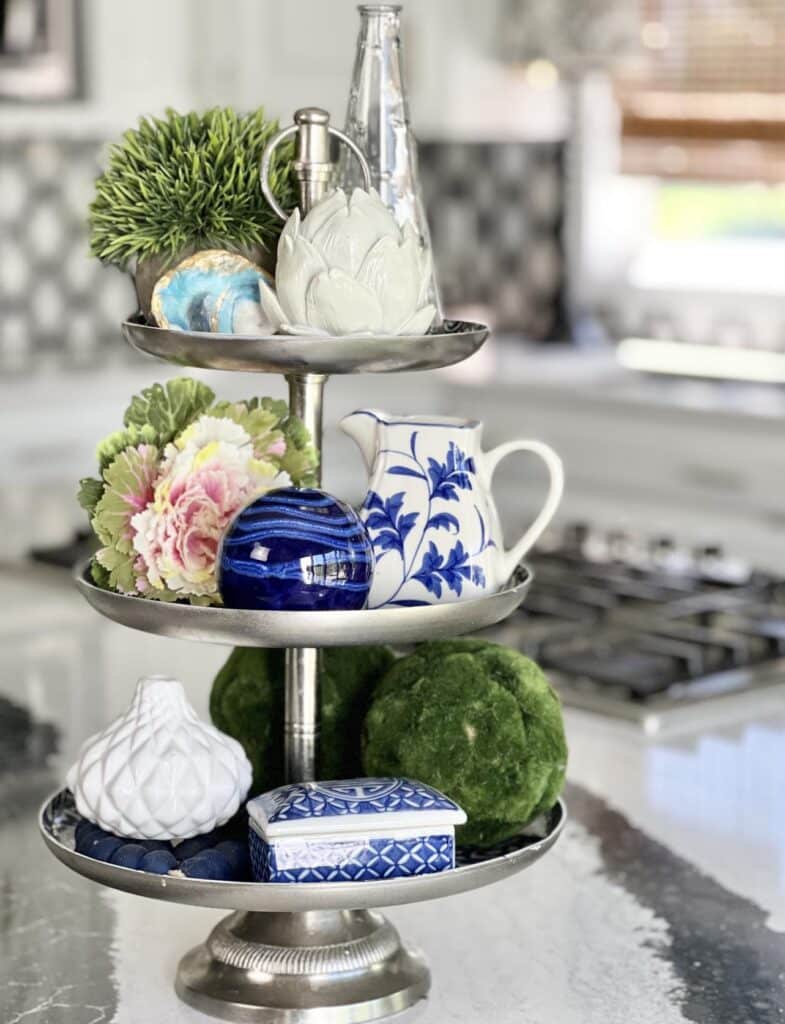 Decorated tiered tray creates visual interest and organization on a kitchen island. Source: Sonata Home Design
Varying Heights of Decor
Mix up your countertop decor with items of different heights to create an eye-catching arrangement. Start with a tall wine bottle or olive oil dispenser (12-15 inches) as your anchor piece. Add medium-height items like a ceramic utensil holder or cookbook stand (8-10 inches) next to it. Complete the look with shorter elements such as small succulents cutting boards or salt and pepper grinders (4-6 inches). Group items in odd numbers following the rule of thirds with taller items toward the back. Keep 2-3 inches between pieces to prevent a cluttered appearance while maintaining a balanced visual flow.
Creating Seasonal Vignettes
Transform your island countertop into a dynamic centerpiece that reflects the changing seasons with curated displays that blend style and functionality.
Holiday-Themed Displays
Create stunning holiday focal points by grouping themed decor in varying heights on your island countertop. During Christmas arrange a collection of mercury glass trees with battery-operated LED candles for a magical display. For Halloween mix black candlesticks with miniature pumpkins painted in metallic colors. Place festive table runners as anchors beneath your displays to protect the countertop surface. Keep your vignettes compact by limiting them to 1/3 of your island’s surface leaving plenty of space for food prep. Switch out metallic accents to match each holiday – copper for fall silver for winter & rose gold for spring. Store seasonal items in labeled bins to make transitions quick & easy.
Seasonal Flower Arrangements
Bring the outdoors in with fresh blooms that celebrate each season’s natural beauty. In spring display tulips & daffodils in clear glass vases of different heights. Summer calls for vibrant sunflowers & wildflowers in rustic mason jars. For fall arrange deep orange dahlias & burgundy mums in copper or brass containers. Winter welcomes white amaryllis & evergreen sprigs in frosted vessels. Place your arrangements on wooden or marble trivets to protect the countertop. Keep displays fresh by changing water daily & trimming stems weekly. Pro tip: Use faux flowers in hard-to-reach spots while mixing in real blooms where they’re easy to maintain.
Incorporating Metallic Accents
Adding metallic elements to your island countertop creates an instant upscale look while reflecting light throughout your kitchen space.
Mixed Metal Elements
Transform your island countertop with a curated mix of metallic finishes that add sophistication and depth. Start with a sleek stainless steel fruit bowl as your anchor piece then layer in brushed nickel candle holders or silver-toned serving pieces. Place a modern chrome trivet next to your cooktop for both function and style. Add small mercury glass vases in varying heights (8-12 inches) filled with dried botanicals for an elegant touch. Don’t shy away from mixing silver chrome brass and gold tones – just keep the ratio balanced with one dominant metal making up 60% of your metallic accents.
Copper and Brass Details
Warm metallic tones like copper and brass instantly add richness to your island countertop styling. Display 2-3 copper Moscow mule mugs on a brass tray for an eye-catching vignette. Add a vintage-inspired brass paper towel holder or utensil crock to blend function with style. Position hammered copper bowls in graduated sizes (6 8 and 10 inches) to create visual interest while maintaining practicality. For a modern twist incorporate geometric brass trivets or copper-rimmed serving boards that you’ll actually use while entertaining. Keep these warm metals polished with regular cleaning to maintain their lustrous appeal.
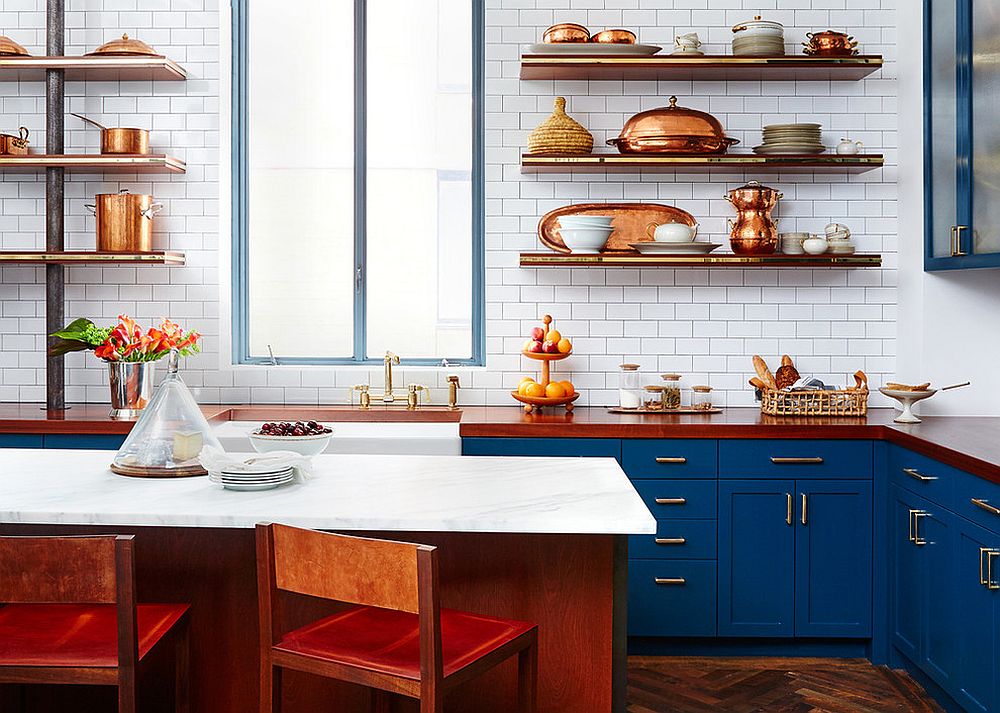 Warm copper tones add elegance and visual interest to this kitchen island display. Source: Decoist
Styling with Books and Recipe Collections
Transform your island countertop into a culinary inspiration hub by showcasing your favorite cookbooks and cherished recipes.
Cookbook Display Ideas
Create an eye-catching cookbook display using sleek acrylic stands to showcase 2-3 seasonal cookbooks at different heights. Position larger coffee table-style cookbooks as anchor pieces with smaller volumes propped nearby. Mix in vintage cookbooks for character keeping covers facing forward to add pops of color. Try using brass or copper bookends that match your kitchen hardware to keep books upright. For a modern touch arrange cookbooks horizontally stacked in groups of three with a small potted herb or salt cellar on top. Keep your display fresh by rotating books monthly based on seasonal cooking inspiration.
Recipe Card Organizations
Install a stylish recipe card holder on your island to keep go-to recipes within easy reach. Choose clear acrylic or wooden holders that complement your kitchen’s style. Sort recipe cards by category using colorful dividers or mini filing systems. Display family heirloom recipes in decorative frames as meaningful kitchen artwork. Store loose recipe cards in vintage recipe boxes or modern leather folios that double as decor pieces. Create designated zones using pretty ceramic trays to separate frequently used recipes from special occasion ones. Add personal touches with handwritten recipe cards displayed alongside printed versions for a collected-over-time feel.
Adding Warmth with Textile Elements
Soften your kitchen island’s hard surfaces with carefully chosen textiles that add both style and functionality to your space.
Designer Tea Towels
Transform your island countertop with artfully displayed designer tea towels that blend form and function. Opt for high-quality linen or cotton towels in patterns that complement your kitchen’s color scheme such as classic stripes French country prints or modern geometric designs. Create an intentional display by folding towels into neat thirds and stacking them in groups of three or draping them casually over a mounted towel bar at one end of the island. Choose seasonal patterns or themed designs to refresh your kitchen’s look throughout the year. For added personality mix vintage tea towels with contemporary ones keeping the color palette cohesive.
:max_bytes(150000):strip_icc()/SPR-find-a-spot-for-that-kitchen-towel-2109418-HERO-76bf0520434f4c1096226597d1af8cf5.jpg) Neatly folded designer tea towels add pattern and texture to a kitchen island. Source: The Spruce
Neatly folded designer tea towels add pattern and texture to a kitchen island. Source: The Spruce
Decorative Runners
Add instant sophistication to your island countertop with a well-chosen decorative runner. Select a washable cotton or indoor-outdoor fabric that can handle kitchen spills while maintaining its beauty. Position the runner down the center of your island leaving 8-12 inches of counter space on each side for practical use. Layer different textures by pairing a woven runner with smooth countertops or try a bold pattern against solid surfaces. For maximum impact choose runners with interesting details like tassels pom-poms or fringe edges. Switch between seasonal options like crisp linens for summer and chunky weaves for winter to keep your space feeling fresh.
Utilizing Negative Space Effectively
Negative space is your secret weapon for creating a sophisticated kitchen island display that doesn’t feel overwhelming or cluttered.
Minimalist Arrangements
Create breathing room on your island countertop by embracing the “less is more” philosophy. Group essential items like a sleek coffee maker salt & pepper mills in small clusters leaving at least 12 inches of empty space between them. A simple marble tray with just 2-3 items makes a stronger statement than a crowded display. Keep your daily-use items contained to one-third of the total surface area leaving the rest deliberately empty. This approach not only looks sophisticated but also gives you plenty of workspace when you need it.
Strategic Placement
Position your decorative elements along the outer edges of your island leaving the center clear for food prep or casual dining. Create intentional zones by placing a fruit bowl on one end balanced by a small herb display on the other. Keep the back edge of your island organized with frequently used items like olive oil dispensers cooking utensils or spice jars. Remember to maintain at least 18 inches of open counter space in front of any seating area. This smart placement strategy helps define spaces while maintaining functionality.
Introducing Artistic Elements
Transform your island countertop into a gallery-like space by incorporating carefully curated artistic elements that reflect your personal style.
Sculptural Pieces
Add visual interest to your island countertop with eye-catching sculptural pieces that double as functional items. Choose sleek marble or ceramic fruit bowls with unique geometric shapes that serve as both storage and art. Position a striking hand-crafted ceramic vase as your centerpiece filled with dramatic branches or left empty to showcase its form. For a modern twist add abstract bookends to keep your cookbooks organized while making a bold statement. Remember to stick to pieces that are 12-15 inches tall to maintain proper sight lines across your kitchen. Group sculptures in odd numbers following the rule of thirds to create an intentional artistic arrangement.
Modern Art Objects
Bring contemporary flair to your island with carefully selected modern art pieces that complement your kitchen’s style. Display a collection of colorful glass paperweights or artistic salt and pepper shakers that add personality without cluttering the space. Consider incorporating small abstract sculptures in materials like brass copper or matte black ceramic that echo your kitchen’s hardware finishes. Position a modern art-inspired utensil holder or napkin stand as a functional focal point. Keep the arrangement minimal with 2-3 statement pieces rather than overcrowding. Choose items that are both beautiful and practical like designer fruit bowls or artistic cutting boards that you’ll actually use.
Creating Functional Zones
Transform your island countertop into distinct areas that serve specific purposes while maintaining a cohesive look.
Dining Areas
Create a welcoming dining spot by designating one end of your island for casual meals. Set up comfortable bar stools with cushions that complement your kitchen’s color scheme. Add placemats or chargers in groups of 2-4 to define each place setting. Keep this area clutter-free by using a slim decorative tray to hold essentials like salt pepper shakers napkin holders. For added style stack a few plates with coordinating cloth napkins nearby. Position a small centerpiece like a low vase with fresh flowers or a modern candleholder to anchor the space without blocking conversation.
Prep Stations
Set up an efficient prep zone by grouping your most-used tools in stylish containers. Place a large wooden cutting board as your base then add 2-3 matching canisters for cooking utensils. Keep frequently used spices in uniform jars on a rotating holder for easy access. Add a sleek knife block or magnetic strip for your essential knives. Use attractive bowls or baskets to corral produce that doesn’t need refrigeration. Position this zone near your cooktop or sink for maximum efficiency. Remember to leave enough open counter space for actual food prep while maintaining the styled look.
Accessorizing with Kitchen Tools
Transform your island countertop into a functional work of art by displaying your most beautiful kitchen tools in thoughtful arrangements.
Artisanal Cutting Boards
Create an eye-catching display by leaning 2-3 handcrafted wooden cutting boards against your backsplash. Mix boards of different sizes woods and shapes like walnut rectangular boards maple round boards and acacia bread boards. Position the largest board at the back and layer smaller ones in front for depth. Add visual interest by alternating horizontal and vertical orientations. For a polished look choose boards with similar finishes or complementary wood tones. Remember to keep your most-used cutting board easily accessible while arranging showpiece boards as decor.
 Beautiful handcrafted cutting boards arranged against a kitchen backsplash create a warm, artistic display. Source: The Lived-in Look
Designer Utensil Holders
Upgrade your utensil storage with stylish containers that double as decor pieces. Pick sleek ceramic crocks copper canisters or handmade pottery in colors that complement your kitchen’s palette. Group holders in varying heights (tall medium short) to create visual rhythm. Fill them with wooden spoons copper utensils and sleek stainless steel tools keeping like materials together. Position your utensil holders in the cooking zone of your island for easy access while preparing meals. Add personality with unique pieces like a vintage pitcher for larger tools or a modern concrete vessel for everyday items.
Personalizing with Family Elements
Transform your island countertop into a space that tells your family’s unique story through carefully curated personal touches.
Family Photos
Display cherished family moments in sleek acrylic frames that protect against kitchen splashes. Arrange 2-3 frames in varying sizes on one end of your island creating an intimate photo gallery. Choose frames that complement your kitchen’s hardware finishes like brushed nickel or matte black. For a modern twist use magnetic photo holders on a small metallic board that lets you easily swap photos seasonally. Keep the display contained to avoid cluttering your workspace while maintaining the personal touch that makes your kitchen uniquely yours.
Heirloom Pieces
Showcase meaningful family treasures that add character to your island countertop. Display grandmother’s vintage ceramic mixing bowl filled with fresh fruit or use great-aunt’s antique cake stand to elevate a modern cookie jar. Position 1-2 special pieces where they won’t interfere with daily tasks but can still spark conversation. Try incorporating your family’s vintage kitchen tools like a restored hand mixer or bronze mortar and pestle as functional art pieces. Group heirlooms with contemporary items to create a balanced blend of old and new that honors your family history while maintaining a fresh modern look.
Maintaining Style and Functionality
Keep your island countertop looking stunning by following these practical maintenance tips. Wipe down decorative items weekly with a microfiber cloth to prevent dust buildup. Rotate seasonal displays every three months to maintain freshness while protecting your decor from kitchen grease and grime.
Choose easy-to-clean materials for your displays to ensure both style and practicality. Opt for washable runners ceramic containers and glass vessels that you can quickly wipe clean during meal prep.