Sun Apr 06 - Written by: Denis Maina
12 Ways to Transform Your Bathroom With The Right Lighting
Your bathroom's more than just a functional space – it's where you start and end each day. But let's be honest: bad lighting can make even the nicest bathroom feel like a dreary cave. The right lighting doesn't just help you see better; it can turn your bathroom into a spa-like retreat.
Think about it: you’ve probably struggled with unflattering shadows while doing your makeup or felt like you’re showering in the dark. These common bathroom lighting issues can make your daily routine frustrating. Whether you’re planning a complete remodel or just want to brighten things up a bit, smart lighting choices can make a huge difference in how your bathroom looks and feels.
1. Understanding Bathroom Lighting Basics: Types And Functions
Getting your bathroom lighting right starts with knowing the basic types and how they work together to create the perfect ambiance.
 This bathroom demonstrates proper task lighting with vanity lights on both sides of the mirror, providing even illumination for grooming tasks. Source: Lightology
Different Types Of Bathroom Lighting
Your bathroom needs three main types of lighting to function at its best:
Task Lighting
- Perfect for daily grooming activities like shaving makeup application
- Usually includes vanity lights or sconces around your mirror
- Provides focused bright light that minimizes shadows on your face
Ambient Lighting
- Creates overall room illumination
- Typically comes from ceiling-mounted fixtures flush mounts or recessed lighting
- Helps you navigate the space safely and comfortably
Accent Lighting
- Adds drama and visual interest
- Includes strip lights under floating vanities or toe kicks
- Highlights architectural features or decor elements
Natural Lighting
- Comes from windows and skylights
- Provides the most flattering light for grooming
- Helps reduce energy costs during daylight hours
The Role Of Color Temperature
Color temperature makes a huge difference in how your bathroom feels and functions:
Warm White (2700K-3000K)
- Creates a cozy spa-like atmosphere
- Perfect for relaxing baths
- Works well with warm-toned decor
- Best for powder rooms and guest bathrooms
Cool White (3500K-4000K)
- Closest to natural daylight
- Ideal for accurate makeup application
- Provides clean crisp lighting
- Great for master bathrooms
Daylight (5000K-6500K)
- Delivers the brightest illumination
- Helps wake you up in the morning
- Perfect for windowless bathrooms
- Creates an energizing environment
| Color Temperature | Best For | Mood |
|---|---|---|
| 2700K-3000K | Evening relaxation | Warm cozy |
| 3500K-4000K | Daily grooming | Natural balanced |
| 5000K-6500K | Morning routine | Energizing bright |
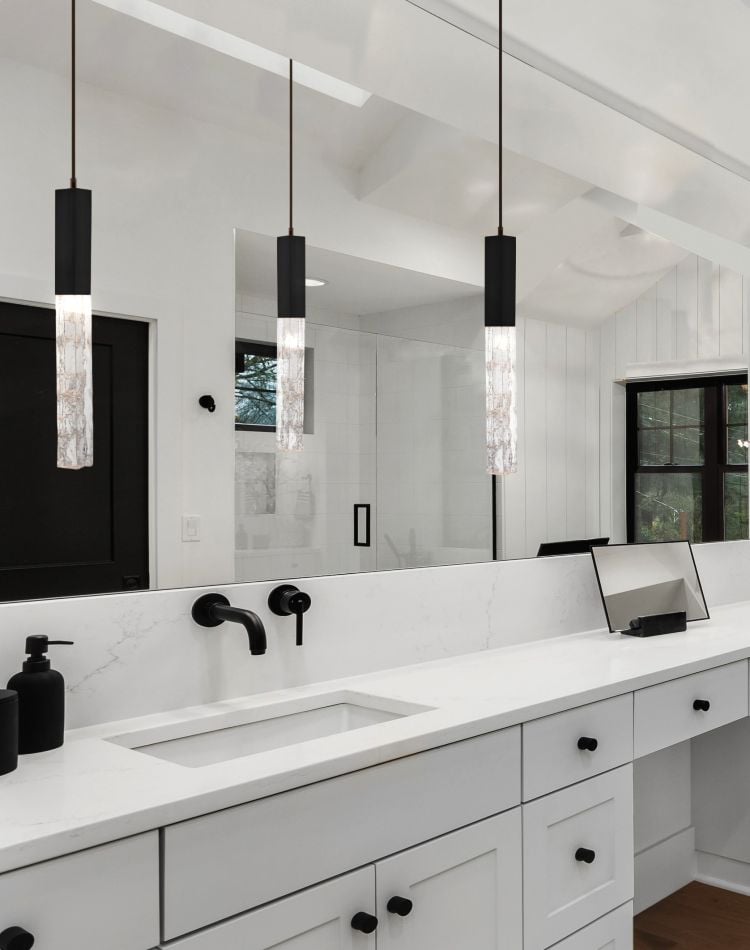
2. Installing Statement Pendant Lights For A Luxurious Touch
Transform your bathroom from ordinary to extraordinary with statement pendant lights that serve as both functional lighting and artistic focal points.
Elegant glass globe pendant lights serve as statement pieces while providing functional lighting beside the vanity mirror. Source: Lightopia
Selecting The Perfect Pendant Style
Choose pendant lights that match your bathroom’s overall design theme. For modern bathrooms go for sleek metal finishes like chrome or matte black. If you’re rocking a more traditional look opt for glass or crystal pendants with vintage-inspired details.
Here are some popular pendant styles for bathrooms:
- Glass globes: Perfect for clean minimal spaces providing soft diffused light
- Industrial-style metals: Great for modern or urban-inspired bathrooms
- Crystal droplets: Add instant glamour and create beautiful light patterns
- Geometric shapes: Make bold statements while maintaining contemporary appeal
- Natural materials: Woven bamboo or rattan works well in spa-like bathrooms
Consider these factors when choosing your pendant:
- Size relative to your vanity (general rule: pendant diameter should be 1/3 of vanity width)
- Light output needed for your space
- Moisture rating (look for UL listed fixtures for damp locations)
- Ceiling height requirements
- Finish that coordinates with existing hardware
Ideal Placement Guidelines
Getting the placement right is crucial for both function and aesthetics. Follow these measurements for perfect pendant positioning:
For single pendants:
- Height: 65-70 inches from floor to bottom of fixture
- Center placement: Align with mirror center
- Clearance: 30-36 inches from vanity surface
For double pendants:
- Spacing: 36-40 inches apart
- Distance from mirror: 18 inches from mirror center to each pendant
- Height matching: Hang both at identical heights
Safety Tips:
- Don’t hang pendants too low in high-traffic areas
- Ensure even lighting distribution across your face
- Account for mirror size when determining height
- Consider sightlines from different room angles
- Leave enough space between fixture and ceiling (minimum 12 inches)
- Adjust heights based on household member heights
3. Incorporating Modern LED Strip Lighting
LED strip lighting offers a sleek modern touch that can transform your bathroom from ordinary to extraordinary with minimal effort and installation.
 Modern LED strip lighting installed around a vanity mirror creates even, shadow-free illumination perfect for grooming tasks. Source: Lepro
Under-Cabinet Lighting Solutions
LED strips beneath your vanity cabinets create a floating effect that’ll make your bathroom feel more luxurious. You’ll love how they provide subtle illumination for nighttime bathroom visits without being too harsh on sleepy eyes. Install them along the bottom edge of wall-mounted cabinets or under floating vanities for best results.
These lights work great as practical night lights while adding a high-end hotel vibe to your space. Most LED strips come with adhesive backing for easy installation and connect to standard outlets or can be hardwired by a professional. You can even find smart LED strips that let you control brightness and color from your phone.
For the best effect place the strips about 1-inch from the cabinet’s front edge. This positioning prevents harsh glare while creating an even wash of light across your floor. Many options are available in warm white (2700K-3000K) which creates a cozy inviting glow or cool white (4000K-5000K) for a more modern look.
Mirror Frame Illumination
Adding LED strips around your mirror creates Hollywood-style lighting that’s perfect for grooming tasks. The continuous light eliminates shadows on your face making it easier to apply makeup shave or style your hair. Position the strips about 2-3 inches from the mirror’s edge for the most flattering effect.
Most mirror frame LED kits are dimmable so you can adjust the brightness to match your needs. During early morning routines dial up the intensity for precise grooming. At night turn them down low for a spa-like ambiance. Look for strips rated at least IP65 for moisture resistance since they’ll be exposed to bathroom humidity.
For extra functionality choose LED strips with color-changing capabilities. Use warm white light (2700K) for relaxing baths cool white (4000K) for morning routines or fun colors for parties. Many smart LED options let you program different lighting scenes for various times of day or activities.
4. Maximizing Natural Light With Strategic Mirror Placement
Natural light creates an open airy feeling in your bathroom while providing the most flattering illumination for grooming tasks. Here’s how to make the most of it with smart mirror placement.
 A luxurious bathroom featuring strategic mirror placement that amplifies natural light from the window, creating a bright, open atmosphere. Source: Freepik
Window Positioning Techniques
Place your primary mirror directly across from your bathroom window to double the natural light flow. This classic designer trick instantly brightens the space by reflecting daylight throughout the room. For maximum effect mount a full-length mirror on the wall opposite your window.
Consider installing a smaller pivoting mirror near your window to redirect light to darker corners. These adjustable mirrors let you control exactly where the light bounces. You’ll want to position them at a 45-degree angle to your window for optimal reflection.
If you have a small window try hanging multiple smaller mirrors in a cluster formation nearby. This creates a prism effect that spreads natural light across more surface area. Stick to simple frames that won’t obstruct the light flow.
For bathrooms with high windows mount tall vertical mirrors underneath to draw the light downward. This helps illuminate the functional areas like your vanity counter while maintaining privacy.
Light-Reflecting Surface Tips
Choose mirrors with beveled edges to scatter light more effectively throughout the space. The angled cuts create mini prisms that distribute daylight in multiple directions. This works especially well with frameless designs.
Pair your mirrors with light-colored walls painted in semi-gloss finish to amplify reflection. White cream or pale gray tones bounce light better than darker shades. The subtle sheen of semi-gloss paint helps multiply the brightening effect.
Install mirrors on adjacent walls to create an infinity effect with natural light. This technique works best in corners near windows. Just be sure to maintain at least 4 feet between parallel mirrors to prevent a dizzy fun-house feeling.
Consider mirrored cabinet doors or a mirrored backsplash to maximize reflection at eye level. These reflective surfaces help spread window light while serving practical storage purposes. Look for moisture-resistant mirror materials rated for bathroom use.
5. Adding Elegant Sconces For Perfect Face Lighting
Wall sconces create the perfect face lighting for your daily grooming routine while adding a touch of sophistication to your bathroom design.
 Elegant wall sconces positioned on both sides of the vanity mirror provide balanced, shadow-free facial illumination ideal for grooming tasks. Source: Yahoo Shopping
Optimal Height And Positioning
Mount your sconces at eye level (about 65-70 inches from the floor) to eliminate unflattering shadows on your face. Position them on both sides of your mirror with 28-32 inches of space between them for even illumination. This setup ensures balanced lighting that’s perfect for applying makeup shaving or skincare routines.
For wider mirrors place additional sconces at regular intervals using the same 30-inch spacing rule. Keep the fixtures 6-8 inches away from the mirror’s edge for optimal light distribution. If you’re working with a double vanity setup ensure each mirror gets its own pair of sconces.
Consider these key measurements for perfect sconce placement:
| Measurement | Distance |
|---|---|
| Height from floor | 65-70 inches |
| Distance between sconces | 28-32 inches |
| Space from mirror edge | 6-8 inches |
| Extension from wall | 4-6 inches |
Style Selection Guide
Choose sconces that complement your bathroom’s existing fixtures and overall design theme. For modern bathrooms opt for sleek chrome or matte black sconces with clean lines and minimal details. Traditional spaces work well with bronze or brass fixtures featuring decorative glass shades.
Here are popular sconce styles for different bathroom themes:
- Modern: Linear LED sconces or cylinder shapes
- Traditional: Lantern-style or bell-shaped glass shades
- Transitional: Simple drum shades or frosted glass designs
- Industrial: Exposed bulb fixtures or cage-style sconces
- Coastal: White or chrome finishes with seeded glass
Remember to check the IP rating (moisture resistance) before making your final choice. Bathroom sconces should have a minimum rating of IP44 for safe operation in damp spaces. Select fixtures that provide 75-100 watts equivalent of illumination per sconce to ensure adequate lighting for grooming tasks.
6. Creating Depth With Layered Lighting Design
Transform your bathroom from flat to fabulous by combining different lighting types that work together seamlessly. Layered lighting adds dimension and creates visual interest while ensuring every corner serves its purpose.
 This bathroom demonstrates perfect layered lighting design with recessed ceiling fixtures for ambient light, sconces for task lighting, and subtle accent lighting that creates depth and visual interest. Source: Houzz
Ambient Lighting Solutions
For your main bathroom lighting start with recessed ceiling lights spaced 4 feet apart. These provide even overhead illumination without taking up visual space. Install them on a dimmer switch so you can adjust the brightness throughout the day.
Try adding a flush-mount ceiling fixture in the center of the room for extra ambient light. Pick one that’s at least 12 inches in diameter to provide enough illumination for a standard-sized bathroom.
Don’t forget about those tricky corners! Use wall-mounted uplights to bounce light off the ceiling and eliminate shadowy spots. Place them 6-7 feet from the floor for the best spread of light.
Here’s a quick brightness guide for ambient lighting:
| Room Size | Recommended Lumens |
|---|---|
| Small (30-50 sq ft) | 3,000-4,000 |
| Medium (50-100 sq ft) | 4,000-6,000 |
| Large (100+ sq ft) | 6,000-8,000 |
Task Lighting Requirements
Your grooming tasks need focused illumination so start with side-mounted lights at the vanity. Place them 28 inches apart at eye level (about 66 inches from the floor) for shadow-free face lighting.
The shower needs its own dedicated light too. Install a wet-rated recessed light directly over the shower area with at least 70-80 lumens per square foot of shower space.
For makeup application or shaving you’ll want to hit these minimum light levels:
| Task Area | Required Lumens |
|---|---|
| Vanity Mirror | 1,000-1,200 |
| Shower | 700-800 |
| Toilet Area | 500-600 |
Add under-cabinet lighting strips beneath wall-mounted vanities. They’ll provide extra task lighting while doubling as night lights when dimmed. Choose LED strips rated at least 250 lumens per foot for adequate brightness.
Remember to pick bulbs with a Color Rendering Index (CRI) of 90 or higher for task areas. This ensures you’ll see colors accurately when applying makeup or choosing outfits.
7. Installing Recessed Lighting For Clean Lines
Recessed lighting offers a sleek modern look while providing even illumination throughout your bathroom. These flush-mounted fixtures disappear into your ceiling creating an uncluttered appearance.
 Clean, modern bathroom design featuring strategically placed recessed ceiling lights that provide even illumination while maintaining visual simplicity. Source: McManus Kitchen and Bath
Spacing And Positioning Tips
For optimal bathroom lighting you’ll want to space your recessed lights about 4 feet apart. Here’s a quick guide to positioning:
- Place the first row of lights 12-18 inches from the wall to avoid harsh shadows
- Center lights over high-traffic areas like the shower vanity & toilet
- Install 4-inch LED cans in smaller bathrooms & 6-inch cans in larger spaces
- Use this formula: divide your ceiling height by 2 to determine ideal spacing between lights (8-foot ceiling = 4-foot spacing)
For the best results aim for this layout:
| Area | Number of Lights | Distance from Wall |
|---|---|---|
| Vanity | 2-3 lights | 30 inches |
| Shower | 1-2 lights | 24 inches |
| General Space | 1 per 36 sq ft | 18 inches |
Waterproof Options For Wet Areas
When installing recessed lights in shower areas or above tubs you’ll need special moisture-rated fixtures. Here’s what to look for:
- Choose IC-rated fixtures with a minimum IP65 rating for shower installations
- Select “wet location” trims that feature sealed lenses
- Look for vapor-tight housings that prevent moisture from seeping in
- Install GFCI-protected circuits for all wet area lighting
Popular waterproof options include:
| Type | Features | Best For |
|---|---|---|
| Sealed LED | Complete moisture protection | Direct shower install |
| Vapor-tight | Rubber gaskets | Above tub areas |
| Marine-grade | Corrosion-resistant | High humidity zones |
Remember to verify that your chosen fixtures meet local building codes for wet locations. It’s worth spending extra on quality waterproof fixtures to ensure long-term safety & performance.
8. Upgrading To Smart Lighting Systems
Transform your bathroom into a tech-savvy space by incorporating smart lighting solutions that combine convenience with energy efficiency.
 Smart motion-activated lighting for bathrooms provides hands-free operation and energy efficiency by automatically illuminating the space when needed. Source: Amazon
Motion Sensor Integration
Smart motion sensors make your bathroom lighting hands-free and more efficient. You’ll never have to fumble for switches with wet hands or worry about lights being left on accidentally. Here’s what makes them a game-changer:
- Place sensors near entry points to trigger lights immediately when you walk in
- Install occupancy sensors that detect prolonged presence for areas like the shower
- Set up nighttime modes with dimmed lighting that activates at 10-20% brightness
- Use PIR (Passive Infrared) sensors in corners to cover the entire bathroom space
- Program timers to automatically shut off lights after 15-30 minutes of inactivity
Smart motion sensors can also help you save up to 30% on your energy bills by eliminating wasted electricity from forgotten lights.
Voice Control Features
Voice-controlled lighting puts complete control of your bathroom ambiance at the tip of your tongue. Compatible with popular smart home assistants like Alexa or Google Home these systems offer:
- Hands-free operation for adjusting brightness levels
- Custom voice commands for specific lighting scenes (“makeup mode” or “relaxing bath”)
- Schedule management for automatic lighting changes throughout the day
- Integration with other smart devices like fans or speakers
- Color temperature adjustments for different times of day
The setup is surprisingly simple:
- Install smart bulbs or switches
- Connect them to your home’s WiFi
- Link them to your preferred voice assistant
- Create custom commands and routines
Most smart lighting systems now offer moisture-resistant options specifically designed for bathroom use with ratings suitable for wet locations.
9. Implementing Dimmable Solutions For Versatility
Dimmable lighting puts you in complete control of your bathroom’s ambiance by letting you adjust brightness levels to match different times of day and activities.
 Modern dimmable bathroom lighting fixture with adjustable brightness settings, allowing you to customize the ambiance from bright task lighting to soft relaxation mode. Source: Amazon
Setting Different Moods
Transform your bathroom’s atmosphere instantly with dimmable lights that adapt to your needs throughout the day. Start your morning with bright crisp light at 100% brightness to help you feel energized and alert. When it’s time for your evening relaxation routine dim the lights to 30-40% for a calming spa-like environment perfect for a long soak in the tub.
Dimmable fixtures work great for middle-of-the-night bathroom visits too. Instead of shocking your eyes with full brightness set them to 10-15% for just enough light to navigate safely while maintaining your sleep rhythm. For makeup application or grooming tasks bump up to 75-80% brightness for optimal visibility without harsh glare.
Install dimmers on multiple circuits to create layered lighting scenes. Set your vanity lights mirror lights and ambient ceiling fixtures to different levels for the perfect combination. Many modern dimmers even let you save your favorite preset combinations for one-touch mood setting.
Energy-Saving Benefits
Dimming your lights isn’t just about atmosphere – it’s a smart way to cut down on energy costs. When you dim lights to 50% you’ll use about 40% less electricity while still getting plenty of illumination for most activities. Over a year these savings really add up on your utility bills.
Dimmable LED bulbs are especially efficient lasting up to 25 times longer than traditional bulbs. Running them at lower brightness levels extends their lifespan even further reducing replacement frequency and costs. Most quality LED dimmers also eliminate flickering and buzzing common with older dimming technology.
The environmental impact is significant too. By using less electricity you’re reducing your carbon footprint. Many dimmable LEDs are also mercury-free and fully recyclable making them an eco-friendly choice for your bathroom lighting upgrade. Plus their precise dimming capability means you’ll never use more light than you actually need for any given task.
10. Using Accent Lighting To Highlight Features
Accent lighting adds drama and visual interest to your bathroom while highlighting architectural elements and decor pieces.
 Dramatic accent lighting used to highlight the textured feature wall and architectural elements in this bathroom, adding depth and visual interest to the space. Source: Cornerstone Custom Construction
Niche And Shelf Illumination
LED strip lights can transform your bathroom niches and shelves into stunning display areas. Install these strips along the top or bottom edge of recessed niches to cast a warm glow on your toiletries spa items or decorative pieces. For glass shelves try placing the strips along the back edge to create a floating effect that makes items appear to glow from within.
You’ll want to choose LED strips with a color temperature between 2700K and 3000K to create an inviting warm ambiance. For extra flexibility opt for dimmable strips that let you adjust the brightness based on the time of day or mood.
Consider these placement options for maximum impact:
- Top-mounted strips to eliminate shadows
- Back-of-shelf lighting for dramatic silhouettes
- Under-shelf strips for a floating appearance
- Corner illumination for wraparound glow
Remember to use moisture-resistant LED strips rated for bathroom use (IP65 or higher). Most strips come with adhesive backing but you might want to add extra mounting clips for long-term security in humid conditions.
Feature Wall Lighting
Transform an ordinary bathroom wall into a stunning focal point with strategic accent lighting. Wall-washing fixtures mounted near the ceiling can create dramatic shadows and highlight textured surfaces like stone tile exposed brick or decorative wallpaper.
Try these popular feature wall lighting techniques:
- Grazing lights to emphasize wall textures
- Uplighting from baseboard level
- Hidden cove lighting for subtle glow
- Picture lights to showcase artwork
For the best results position your wall lights 12-18 inches from the feature wall. This distance provides optimal spread while minimizing harsh shadows. Choose fixtures with beam angles between 30-60 degrees depending on your wall height and desired effect.
To prevent glare aim the lights at a 30-degree angle toward the wall. If you’re highlighting artwork use dedicated picture lights with adjustable heads to reduce reflections on glass frames. Make sure to select fixtures with at least 400-600 lumens for adequate illumination of larger wall sections.
12. Selecting Energy-Efficient Fixtures
Make your bathroom eco-friendly while cutting energy costs with smart fixture choices.
 Modern energy-efficient LED bathroom lighting fixture that provides bright, clean illumination while consuming significantly less power than traditional lighting solutions. Source: Amazon
LED Technology Benefits
LED lights are your best bet for bathroom lighting that’ll last for years. These powerhouse fixtures use up to 75% less energy than traditional bulbs while lasting 25 times longer. Here’s what makes them great:
- They turn on instantly without any warm-up time
- Most LEDs are fully dimmable giving you complete control
- They produce minimal heat making them safer for bathroom use
- The average LED bulb lasts 50000 hours (that’s about 11 years of daily use)
- They’re available in various color temperatures from warm (2700K) to daylight (5000K)
Modern LED fixtures now come with impressive features like:
- Color-changing capabilities through smartphone apps
- Built-in moisture resistance perfect for bathrooms
- Motion sensor options for hands-free operation
- Smart home compatibility for voice control
Cost-Saving Solutions
While energy-efficient fixtures might cost more upfront they’ll save you money in the long run. Here’s how to maximize your savings:
Quick Money-Saving Tips:
- Replace all incandescent bulbs with LEDs to save $75 yearly per bulb
- Install motion sensors to cut energy waste by 30%
- Use dimmer switches to extend bulb life and reduce energy use
- Choose ENERGY STAR certified fixtures for guaranteed efficiency
Shopping Strategies:
- Buy multi-packs of LED bulbs for better value
- Look for utility company rebates on energy-efficient fixtures
- Install timer switches to prevent lights from staying on too long
- Focus on high-use areas first like vanity lights and overhead fixtures
The average bathroom can reduce its lighting costs from $120 to just $30 per year by switching to efficient fixtures. Plus you’ll only need to replace your bulbs every 10-15 years instead of annually.
Planning Your Bathroom Lighting Transformation
Before diving into your bathroom lighting makeover start with these essential steps:
- Measure Your Space
Take detailed measurements of your bathroom including ceiling height vanity width and mirror dimensions. This’ll help you choose fixtures that fit perfectly.
- Set Your Budget
Create a realistic budget that includes fixtures installation costs and any electrical work. Most basic lighting upgrades cost $200-$600 while comprehensive transformations run $1,000-$3,000.
- List Your Activities
Write down everything you do in your bathroom (makeup application shaving reading) to ensure your lighting plan supports each task.
- Check Building Codes
Review local building codes for bathroom lighting requirements especially around wet zones. Most areas require specific IP ratings for fixtures near water sources.
- Map Your Layout
Sketch your bathroom and mark where you’ll place each light fixture. Consider existing electrical points and potential new wiring needs.
These initial planning steps will help you create a solid foundation for your lighting transformation while avoiding costly mistakes later.