
Tue Mar 26 - Written by: Ruth
10 Budget-Friendly Ways to Decorate Your Small Studio
Discover affordable ways to decorate your small studio apartment without breaking the bank. Learn creative solutions for maximizing space and adding style on a budget.
Living in a small studio doesn’t mean you can’t make it look amazing! Decorating a tiny space on a budget might seem tricky but with some clever tricks and budget-friendly ideas you can transform your studio into a cozy haven that reflects your style.
Whether you’re a student, a young professional, or someone who loves compact living, you don’t need to spend big bucks to make your space look fantastic. We’ve rounded up 10 creative and wallet-friendly decorating ideas that’ll help you maximize your studio’s potential without breaking the bank. From DIY wall art to smart storage solutions, these tips will show you how to turn your small space into a stylish home sweet home.
Understanding Your Small Studio Space Before Starting
Before diving into decorating your studio apartment, you’ll need to understand your space inside and out. This critical first step helps you make informed decisions about furniture placement and decor choices.
 3D floor plan showing strategic organization of a studio apartment with clearly defined zones. Source: RoomSketcher
Measuring Your Space
Start by grabbing a measuring tape and noting down the dimensions of every wall, window and door. You’ll want to measure the ceiling height too since vertical space is precious in a studio. Don’t forget to document smaller details like electrical outlets, radiators and built-in features that might affect furniture placement.
Keep these measurements handy on your phone or in a small notebook – they’ll be super useful when shopping for furniture or planning DIY projects. Pro tip: measure the width of your doorways and stairwells to ensure new furniture can actually make it into your space.
Creating a Floor Plan
Turn those measurements into a simple floor plan using graph paper or a free online tool like RoomSketcher or Floorplanner. Mark out your windows, doors and permanent fixtures first.
Then experiment with different furniture arrangements by cutting out scaled paper pieces to represent your furniture – this lets you try various layouts without breaking a sweat.
Consider traffic flow by leaving at least 30 inches of walking space between furniture pieces. Map out distinct zones for sleeping, living and dining even if they’ll share the same space. This visual guide will help you maximize every square foot while keeping your studio functional.
Maximizing Natural Light With Strategic Mirror Placement
Strategic mirror placement can instantly make your studio feel twice its size while brightening dark corners. Here’s how to maximize this budget-friendly decorating trick.
A strategically placed mirror across from a window doubles natural light and creates the illusion of more space. Source: Never Too Small
Best Spots for Mirror Installation
Position a large mirror directly across from your biggest window to reflect natural light throughout the room. This placement doubles the amount of sunlight and creates the illusion of a second window.
Mount mirrors on walls adjacent to windows to bounce light into darker areas of your studio. You’ll get great results by placing a mirror behind a light source like a table lamp or floor lamp.
For tiny studios, consider installing mirror panels on closet doors to create depth while serving a practical purpose. Just avoid placing mirrors directly facing your bed or main seating area, which can feel awkward.
Budget-Friendly Mirror Shopping Tips
Check thrift stores and flea markets for vintage mirrors you can easily update with spray paint. Keep an eye on Facebook Marketplace and Craigslist where people often sell mirrors at steep discounts when moving.
Consider buying frameless mirror tiles from home improvement stores – they’re typically under $10 each and you can arrange them in creative patterns. Look for damaged mirrors with intact glass but scratched frames which you can often get at 50-70% off.
For a modern look, grab inexpensive IKEA mirrors or wait for seasonal sales at stores like Target and HomeGoods where you’ll find trendy options under $50.
Creating Storage Solutions With DIY Floating Shelves
Transform your studio’s vertical space into functional storage with budget-friendly floating shelves that cost under $30 per set.
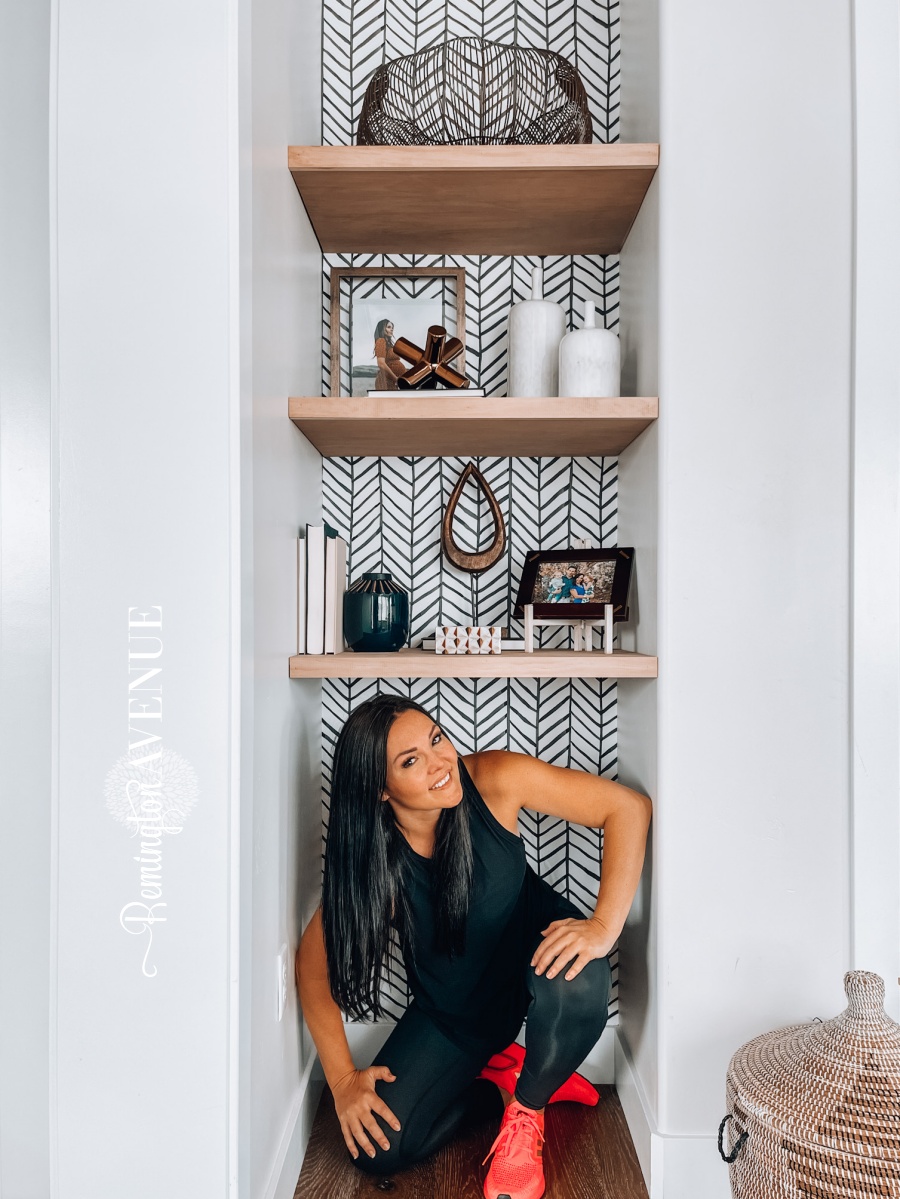 Simple DIY floating shelves provide both storage and display space in a limited area. Source: Remington Avenue
Materials Needed
- 1×2 inch wooden boards (for braces)
- 1×6 inch wooden planks (for shelf tops)
- Wood screws (2.5 inches)
- Wall anchors
- Level
- Drill with bits
- Pencil
- Measuring tape
- Sandpaper (medium & fine grit)
- Wood stain or paint
- Paintbrush or foam roller
- Wood glue
- Stud finder
- Locate wall studs using your stud finder & mark their positions
- Measure & cut your 1×2 boards into three pieces for each shelf (two vertical braces & one horizontal)
- Sand all wood pieces until smooth
- Create an L-shaped bracket by attaching horizontal & vertical pieces with wood glue & screws
- Mark your desired shelf height on the wall
- Drill pilot holes into studs & install wall anchors where needed
- Attach brackets to wall using 2.5-inch screws
- Place 1×6 shelf board on top of brackets
- Secure shelf board to brackets with screws from underneath
- Stain or paint your shelves to match your decor
Transforming Blank Walls With Affordable Art
Blank walls can make your studio feel incomplete, but filling them doesn’t have to drain your wallet. Here are smart ways to add personality to your walls without overspending.
 Creative gallery wall arrangement using affordable art prints and DIY pieces. Source: Apartment Therapy
DIY Wall Art Ideas
- Create a photo wall collage using your favorite snapshots printed at your local drugstore for under $20
- Frame pressed leaves, flowers, or botanical prints from old books for natural wall decor
- Make abstract art using painter’s tape geometric patterns and affordable craft paint
- Design word art with stick-on letters or hand lettering on canvas
- Paint simple shapes on thrifted canvases using basic colors that match your decor
- Create a gallery wall with empty vintage frames painted in coordinating colors
- Design custom wall hangings using yarn, macramé cord, or wooden beads
- Make oversized art by painting directly on a flat bedsheet stretched over a frame
- Turn favorite fabric scraps into wall art using embroidery hoops
- Paint color blocks or stripes directly on the wall using sample-size paint pots
Where to Find Affordable Prints
- Browse Society6 during their frequent 40% off sales for trendy affordable prints
- Check Etsy for digital downloads you can print locally starting at $2-5
- Follow local artists on Instagram who often sell prints cheaper than galleries
- Visit college art shows where student works are typically budget-friendly
- Scout Facebook Marketplace for people selling unwanted art pieces
- Download free vintage botanical, medical, or scientific illustrations from public domain sites
- Check IKEA’s art section for large-format prints under $30
- Browse TJMaxx, HomeGoods, or Marshall’s rotating art selection
- Search Amazon for print sets that can create an instant gallery wall
- Visit thrift stores for unique vintage pieces you can update with fresh frames
Adding Life With Low-Maintenance Indoor Plants
Indoor plants can instantly transform your studio while purifying the air – all without breaking your budget. Here’s how to create your own mini indoor jungle:
:strip_icc()/white-shelves-around-head-of-bed-22f81422-2000-6e6726aa734c45209bdeca28c937e38c.jpg) Low-maintenance plants like snake plants and pothos bring life to small spaces without requiring much care. Source: Better Homes & Gardens
Low-maintenance plants like snake plants and pothos bring life to small spaces without requiring much care. Source: Better Homes & Gardens
Best Plants for Small Spaces
Snake plants thrive in low light and need minimal watering, making them perfect for busy studio dwellers. ZZ plants are equally hardy and can survive in almost any lighting condition.
Pothos varieties like Golden or Marble Queen trail beautifully from shelves while requiring little maintenance. Spider plants work great in hanging baskets and produce baby plants you can propagate for free.
For tiny windowsills, try compact succulents or air plants that need just a weekly misting. These plants typically cost $10-25 each at garden centers or $5-15 at big box stores.
Creative Planting Solutions
Transform everyday items into unique planters to save money and add personality. Use mason jars painted in metallic colors for herbs or mount wooden wine crates on walls for vertical gardens. Create a living wall with pocket planters made from fabric shoe organizers ($15-20).
Hang macramé plant holders you can DIY with rope from the dollar store. Stack wooden crates as plant stands or use vintage teacups from thrift stores as mini planters. For larger plants, elevate them on painted concrete blocks or repurposed metal stools to add height variation without spending much.
| Plant Type | Light Needs | Water Frequency | Average Cost |
|---|---|---|---|
| Snake Plant | Low-Medium | Every 2-3 weeks | $10-20 |
| ZZ Plant | Low-Bright | Every 2-3 weeks | $15-25 |
| Pothos | Medium | Weekly | $8-15 |
| Air Plants | Bright indirect | Weekly misting | $5-10 |
| Succulents | Bright | Every 2-3 weeks | $5-12 |
Using Multi-Purpose Furniture for Space Efficiency
Smart furniture choices can maximize your studio’s functionality without breaking the bank. Here’s how to make the most of dual-purpose pieces.
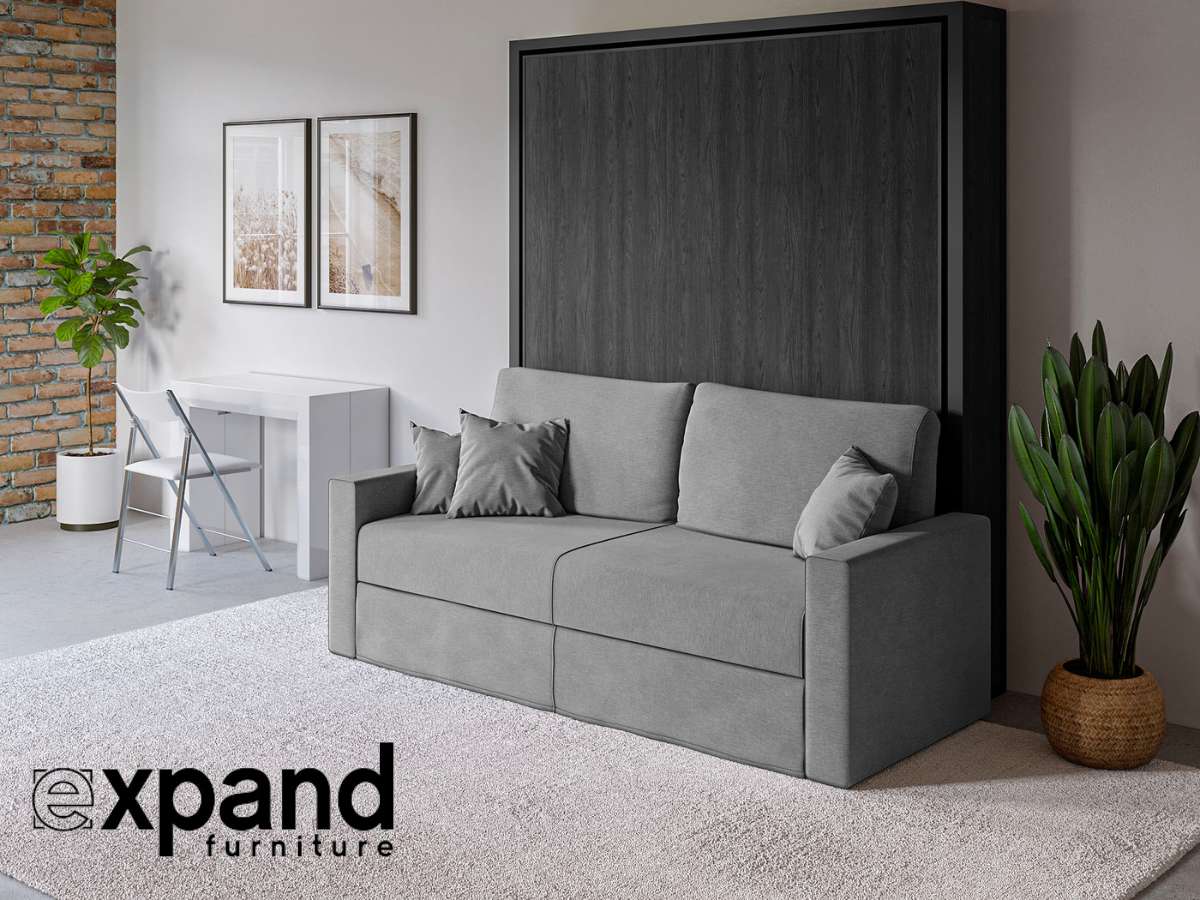 Multi-functional furniture solutions that maximize space in small studios, including convertible pieces. Source: Expand Furniture
Convertible Furniture Ideas
Transform your studio with these space-saving furniture solutions:
- Murphy beds double as shelving units during the day saving up to 25 square feet of floor space
- Ottoman storage benches provide extra seating while hiding blankets books or seasonal items
- Nesting coffee tables slide apart for entertaining then stack together when not in use
- Folding dining tables mount to walls and fold down when needed with built-in storage
- Modular sofas adapt to your needs with removable sections and hidden storage compartments
- Drop-leaf desks attach to walls and create instant workspaces without permanent bulk
- Expandable console tables stretch from 18 inches to 6 feet perfect for dinner parties
Where to Find Budget Pieces
Score affordable multi-purpose furniture from these sources:
- Facebook Marketplace: Search daily for local deals often 40-60% below retail
- IKEA: Check their “as-is” section for floor models at 20-50% off
- Amazon Warehouse: Find returned items with minor damage at steep discounts
- Wayfair’s clearance section: Shop end-of-season sales for up to 70% off
- Local thrift stores: Visit weekly for unique pieces under $100
- Target’s seasonal sales: Wait for major holidays to save 30-40% on furniture
- Overstock: Browse their closeout deals for name-brand pieces at discount prices
Remember to check measurements carefully and read reviews before purchasing any piece for your studio.
Incorporating Room Dividers on a Budget
Creating distinct zones in your studio doesn’t require expensive built-in walls or bulky furniture. Here’s how to divide your space effectively without spending much.
 Curtain room divider creating a private sleeping area while maintaining an open feel. Source: The Nordroom
DIY Room Divider Options
- Transform an old ladder into a stylish divider by painting it and adding plants, macramé hangers, or floating shelves.
- Create a rope divider using natural fiber rope threaded through copper pipes mounted from floor to ceiling ($30-40 total).
- Hang curtains from a tension rod between walls for an instant soft divide ($20-25 at discount stores).
- Build a bookshelf divider using milk crates or wooden boxes stacked and secured together ($15-25).
- Repurpose old window frames by hanging them from the ceiling with decorative chains as an artistic separator.
- String together bamboo blinds for an organic natural-looking partition ($25-35 per panel).
- Use pegboards as dividers while adding storage – paint them to match your décor ($20-30).
Strategic Placement Tips
- Position dividers perpendicular to windows to maintain natural light flow throughout your space.
- Keep dividers 2-3 feet away from walls to create natural walkways and prevent cramped corners.
- Use shorter dividers (around 5 feet tall) to maintain an open feeling while still defining separate areas.
- Place dividers strategically to hide storage areas or create a cozy sleeping nook.
- Consider movable options like folding screens to adjust your space as needed.
- Align dividers with existing architectural features like support columns or ceiling beams for a built-in look.
- Leave 3-4 feet of open space above dividers to maintain airflow and visual connection between areas.
Brightening Spaces With Strategic Lighting
Good lighting can transform your tiny studio from drab to fab without breaking the bank. Here’s how to illuminate your space effectively on a budget.
 Strategic lighting placement creates ambiance and makes a small space feel larger. Source: TCP Lighting
Budget Lighting Solutions
String lights aren’t just for dorm rooms anymore! Get creative with $10-15 LED strip lights from Amazon to add indirect lighting under cabinets or along baseboards. Hit up thrift stores for unique table lamps ($5-20) or spray paint old ones in modern metallic finishes.
Plug-in sconces ($25-40) offer a high-end look without hiring an electrician – just stick them on the wall with Command strips. Try battery-operated puck lights ($15 for 3) inside closets or dark corners. For ambient lighting, score smart bulbs from IKEA ($8-12) that let you adjust brightness and color temperature from your phone.
Placement Tips
Layer your lighting at different heights to create depth in your studio. Place floor lamps in corners to wash walls with light and make the space feel larger. Position task lighting like desk lamps where you need focused illumination for reading or working.
Bounce light off walls by aiming adjustable lamp heads upward. Keep cords tidy by running them along baseboards with cable clips. Avoid putting all your lights at the same height – mix it up with pendant lights high overhead, sconces at eye level, and table lamps down low. Place mirrors strategically to reflect light sources and brighten dark areas.
Adding Color With Textile Accessories
Transform your studio’s look instantly with budget-friendly textile additions that pack a serious style punch without the hefty price tag.
 Vibrant textile accessories add color and texture to a compact living space without permanent commitment. Source: Pinterest
Affordable Textile Options
Add vibrant throw pillows from HomeGoods or Target’s clearance section for $10-20 each. Score cozy blankets at TJ Maxx or Marshalls for under $25 that double as decorative elements when draped over furniture. Hunt for curtains at IKEA’s “as-is” section or Amazon Basics for $15-30 per panel.
Check Facebook Marketplace for gently used area rugs at 50-70% off retail prices. Transform plain cushions with colorful slipcovers from Amazon for $15-25. Shop end-of-season sales at stores like Walmart and Target for deep discounts on textile accessories. Consider washable duvet covers as an affordable way to change your bedroom’s entire look for under $40.
Mixing and Matching Patterns
Start with a simple rule of three: one large pattern, one medium pattern, and one small pattern. Mix florals with stripes or geometric prints, keeping colors in the same family. Use the 60-30-10 rule: 60% dominant pattern, 30% secondary pattern, and 10% accent pattern.
Stick to a consistent color palette when combining different patterns to maintain harmony. Choose one bold statement piece like a patterned throw pillow, then add subtler patterns in complementary colors.
Balance busy patterns with solid colors to prevent visual overwhelm. Consider scale when mixing patterns – pair large-scale prints with smaller, detailed designs for contrast.
Making Impact With Paint and Removable Wallpaper
Transform your studio walls without breaking your lease or your budget using these smart painting techniques and temporary wall solutions.
 Peel and stick wallpaper creates a dramatic accent wall without damaging rental property walls. Source: Emily Henderson
Cost-Effective Paint Techniques
Create a bold accent wall using sample-size paint pots that cost under $10 each. Try color blocking with painter’s tape to design geometric patterns or stripes that’ll make your space pop. You can also use a basic roller and leftover paint to create an ombre effect by gradually blending two colors.
For texture without extra cost, try the sponge technique using a regular kitchen sponge dipped in paint. Get creative with stencils made from cardboard to paint custom patterns like polka dots or honeycomb shapes. Paint just the lower third of your walls for a modern wainscoting look that uses less paint while making your ceilings appear higher.
Temporary Wall Solutions
Peel-and-stick wallpaper offers endless design possibilities without damaging your walls. Look for end-of-roll discounts or remnants at home improvement stores to save money. Create an accent wall using contact paper in metallic or wood-grain finishes for under $20.
Try washi tape to make geometric patterns or frame out sections of your wall for an architectural look. Fabric wallpaper is another budget-friendly option – simply starch lightweight fabric directly onto your walls for a removable custom look. For rental-friendly murals, use removable decals from discount home stores or create your own design using vinyl wall stickers from craft stores.
Conclusion: Bringing Your Budget-Friendly Design Together
Start with your most impactful changes like painting walls or adding mirrors to create the illusion of space. Layer in your storage solutions and room dividers next to establish distinct zones.
Finally, add decorative elements like plants, DIY art, and textiles to inject personality while maintaining a cohesive look throughout your studio space.